Part 1 — The Landing Page Demo
Goal: a brand-new visitor understands what Wave Studio is, drives the free interactive demo confidently, and knows where the download, setup and FAQ sections live.
Runtime: 4–5 minutes.
You need: a browser open at the Wave Studio welcome page (welcome.html locally, or the published site). Dark theme. Nothing installed.
Images: images/p1-hero.png, images/p1-more-controls.png, images/p1-downloads.png, images/p1-setup.png.
1.1 Cold open — the hero
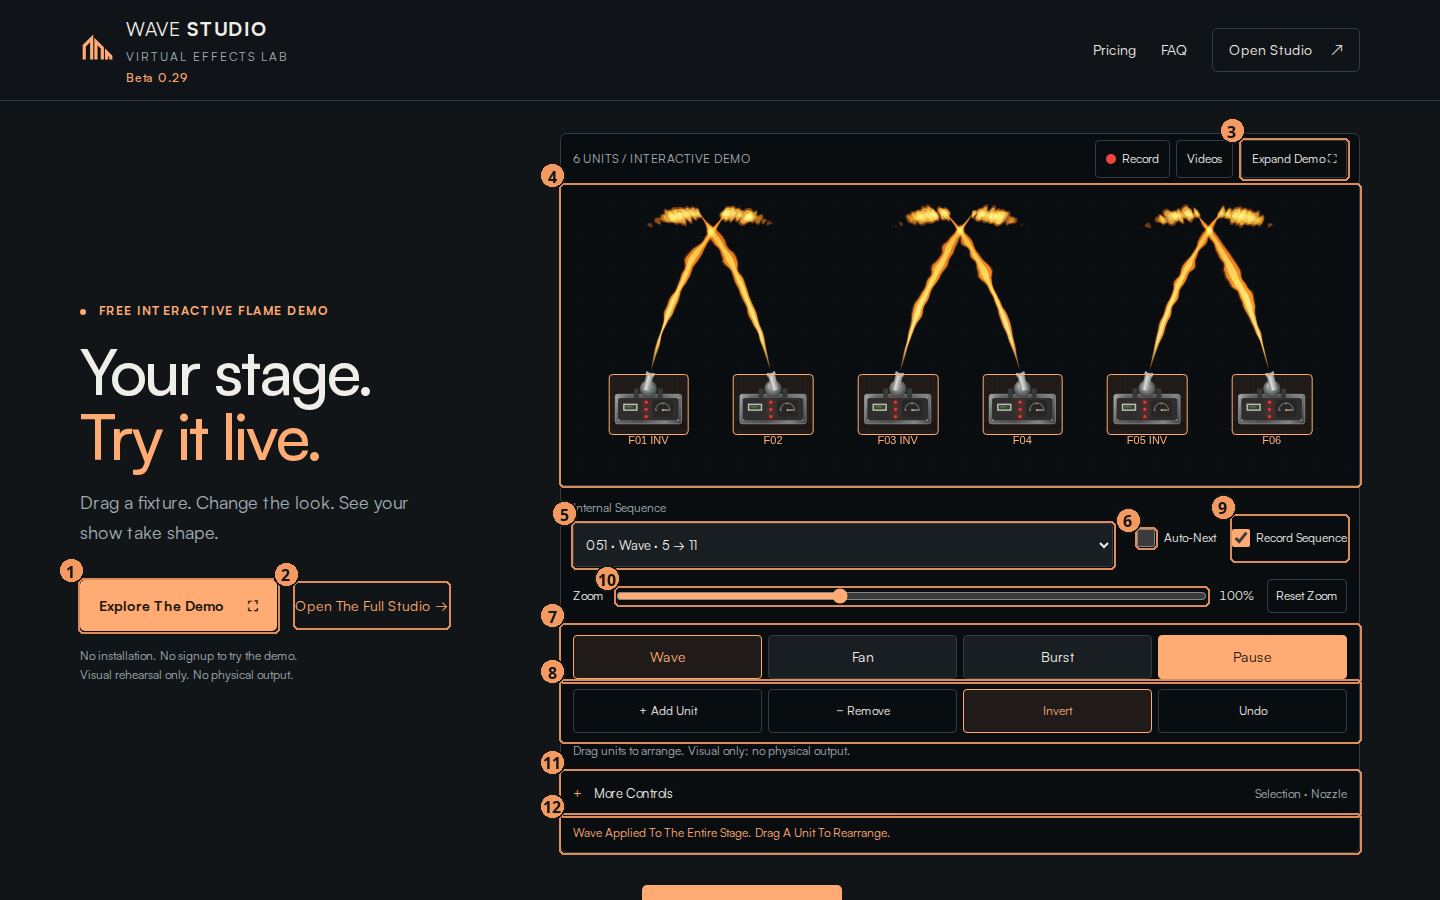
| # | Callout | What it is |
|---|---|---|
| 1 | Explore The Demo | Scrolls to and expands the interactive demo editor. |
| 2 | Open The Full Studio | Opens index.html, the complete program (Part 2). |
| 3 | Expand Demo | Grows the demo editor to fill the width. |
| 4 | Interactive stage | A live canvas showing six X2 Wave Flame units, F01–F06. F01, F03 and F05 are inverted (mounted upside-down), so their flames mirror. |
| 5 | Internal Sequence | Dropdown of the X2's internal sequences available in the demo, 001–070. |
| 6 | Auto-Next | When ticked, the demo steps to the next sequence automatically when the current one ends. |
| 7 | Quick Looks | Wave, Fan, Burst, and Pause — one-click looks applied to the whole stage. |
| 8 | Layout toolbar | + Add Unit, − Remove, Invert, Undo. |
| 9 | Record Sequence | When ticked, the Record button captures the current sequence as a video clip. |
| 10 | Zoom | Zoom slider and Reset Zoom for the demo stage. |
| 11 | More Controls | Expands selection and nozzle options (next image). |
| 12 | Status line | Plain-language confirmation of what just happened. |
| Script (speak) | On screen (do) |
|---|---|
| "This is Wave Studio — a virtual rehearsal lab for the Explo X2 Wave Flame. Before you install anything, the welcome page gives you a working stage right in the browser. Six units, real sequence timings, no sign-up, and — this matters — visual only. Nothing here can ever fire a unit." | Page loaded at the top. Hover the small print under the buttons: "No installation. No signup… Visual rehearsal only. No physical output." |
| "Two doors. Explore The Demo keeps you on this page. Open The Full Studio takes you into the complete program, which is Part 2. Let's start with the demo." | Hover 1, then 2. Click 1. |
| "The stage 4 is a front elevation. Each box along the bottom is a unit — F01 through F06 — and the three marked INV are inverted, mounted upside-down, so their flame mirrors the others. Drag a unit to move it. Drag empty space to box-select several at once." | Drag F04 a little to the right. Drag a box around F02–F04, then click empty space to deselect. |
1.2 Looks and sequences
| Script | On screen |
|---|---|
| "Quick Looks 7 are the fastest way to see what the unit does. Wave sets a sweeping arc across the whole stage. Fan spreads the units outward. Burst is a short vertical hit. Pause freezes the stage so you can study a frame." | Click Wave, let it run, then Fan, then Burst, then Pause. Click Pause again to resume. |
| "Under the stage, Internal Sequence 5 is the real list — the X2's built-in programs. The demo exposes seventy of them. Pick one and the whole stage plays it. Tick Auto-Next 6 and it becomes a slideshow: every time a sequence ends the demo advances to the next one, which is a very quick way to audition the catalog." | Open the dropdown, choose 051 · Wave. Tick Auto-Next, let two sequences roll, untick. |
| "The layout toolbar 8 is what you would expect: add a unit, remove the selected one, invert it, and undo. Invert is the one you will use most, because real rigs mix upright and inverted heads." | Click + Add Unit (F07 appears), select it, click Invert, then Undo twice. |
| "The zoom slider 10 is handy when you add a lot of units. Reset Zoom snaps back to 100%." | Drag zoom down to ~70%, click Reset Zoom. |
1.3 Recording from the demo
| Script | On screen |
|---|---|
| "You can record straight from the demo. Tick Record Sequence 9, press Record, and Wave Studio captures the stage as a video clip — watermarked in the corner with the logo and 'Made with WaveStudio Beta 0.3', so a clip can travel on its own. Videos lists what you have captured so far." | Tick Record Sequence, click Record, run a Burst, click the button again to stop, then click Videos and close it. |
1.4 More Controls
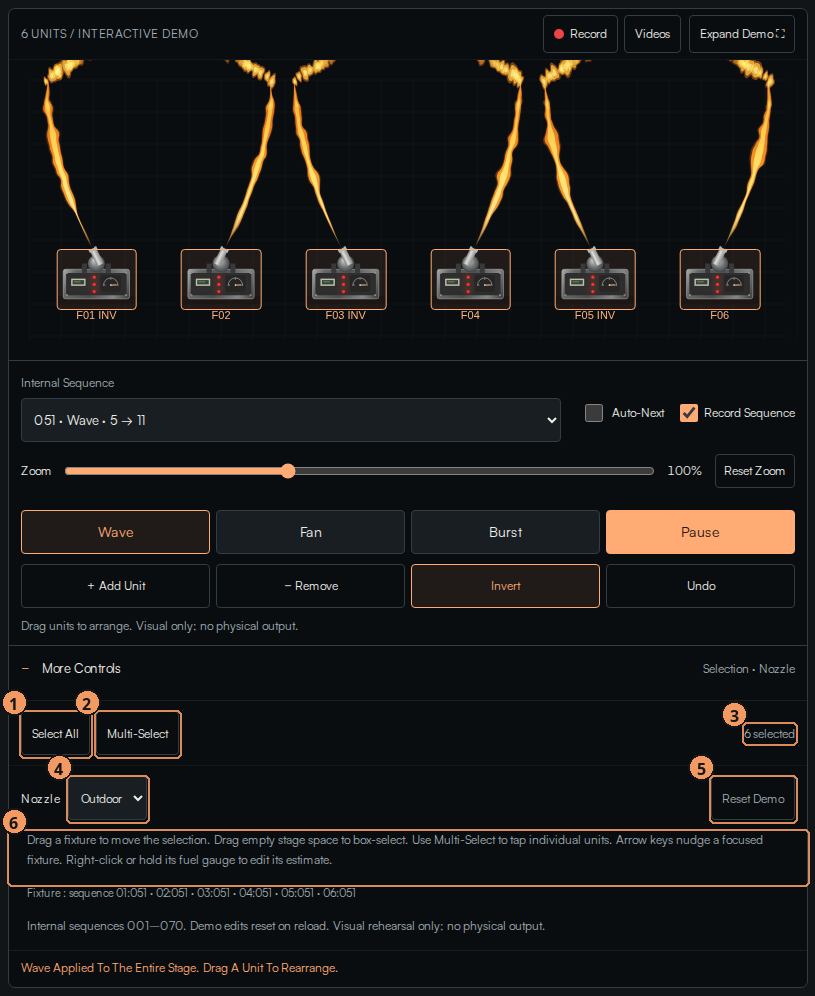
| # | Callout | What it is |
|---|---|---|
| 1 | Select All | Selects every unit on the demo stage. |
| 2 | Multi-Select | Toggle: each click adds to the selection instead of replacing it. |
| 3 | Selection count | How many units are currently selected. |
| 4 | Nozzle | Indoor / Outdoor nozzle; changes the rendered flame height. |
| 5 | Reset Demo | Puts the six units and their looks back to the shipped state. |
| 6 | Instructions | The full gesture list: drag, box-select, arrow-key nudge, right-click or hold a fuel gauge to edit its estimate. |
| Script | On screen |
|---|---|
| "More Controls 11 opens a drawer with selection helpers and the nozzle choice. Select All, a sticky Multi-Select, and a count so you always know what a change will hit. Nozzle switches between the indoor and outdoor nozzle — the outdoor nozzle throws a taller flame, and the simulation follows." | Click More Controls. Click Select All, note the count, switch Nozzle to Outdoor, run a Burst, switch back. |
| "If you ever get lost, Reset Demo restores the six-unit stage. The status line 12 at the bottom tells you, in words, what the last action did." | Click Reset Demo. Read the status aloud. |
1.5 Downloads, setup and questions
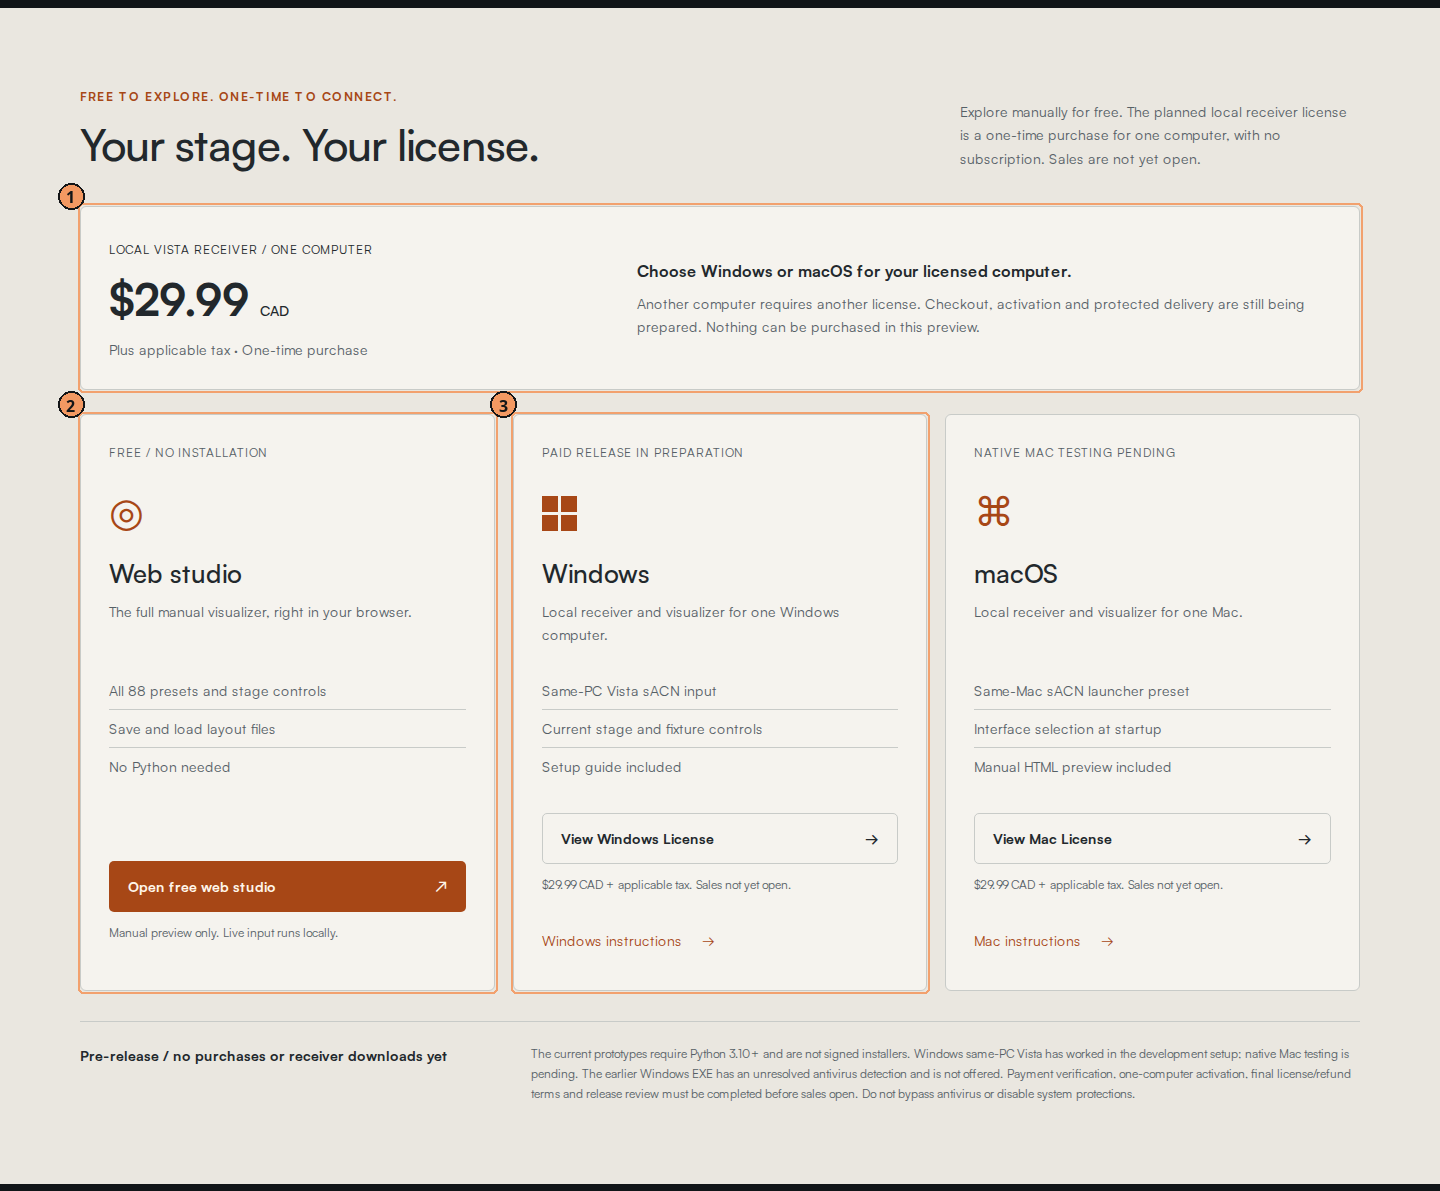
| # | Callout | What it is |
|---|---|---|
| 1 | License summary | One computer per license; the price shown on the page (CAD). |
| 2 | Windows package | Desktop receiver bundle; the paid release is in preparation. |
| 3 | macOS package | Native Mac testing is still pending; the macOS receiver is a Python script. |
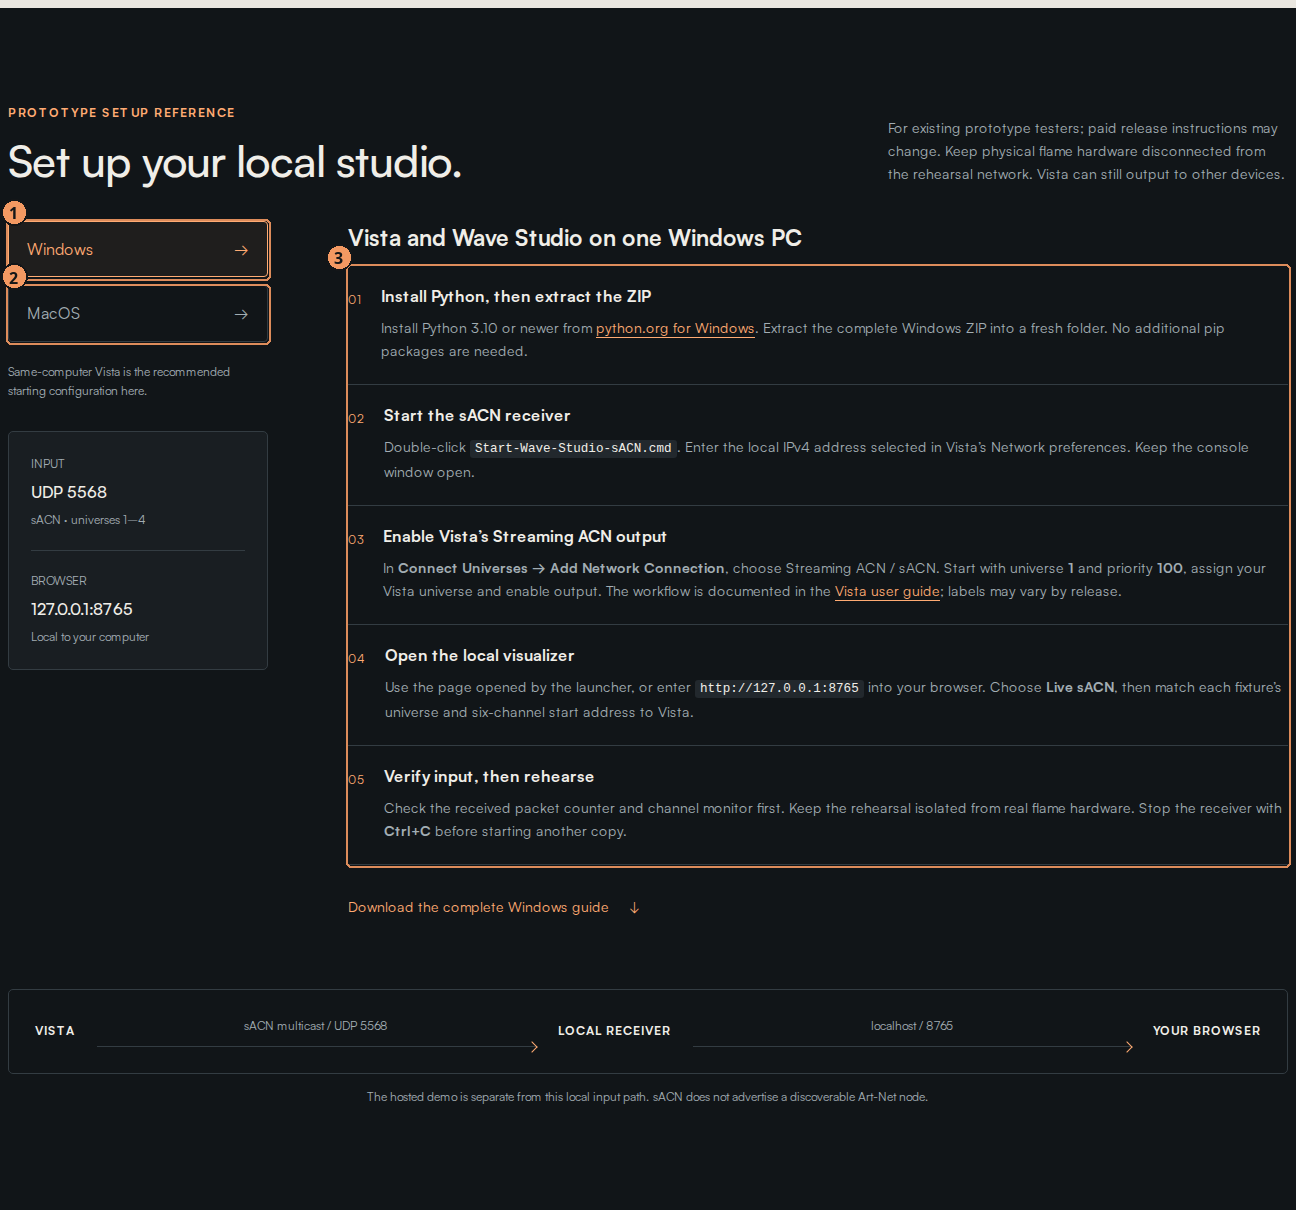
| # | Callout | What it is |
|---|---|---|
| 1 | Windows tab | Step list for Windows: extract, install Python, run the start script. |
| 2 | macOS tab | Step list for macOS. |
| 3 | Setup steps | The numbered steps for the selected platform. Part 5 covers them in detail. |
| Script | On screen |
|---|---|
| "Scroll down and the page becomes the product sheet. Downloads shows the one-computer license and the two desktop packages — Windows and macOS. Both are receivers: they let a lighting console on your network drive the simulator. The browser studio itself needs nothing installed." | Scroll to Downloads. Hover the Windows card and the macOS card. |
| "Setup has a tab per platform with the exact steps. We will walk them in Part 5 when we connect Vista, so skip them for now. Under that is the FAQ, and the page ends with the same two doors we started with." | Scroll through Setup, FAQ, and the closing call-to-action. |
| "That is the demo. Next: the full studio — same stage, every control." | Click Open The Full Studio. |
Recap
- The demo runs with no install and is visual only.
- Drag to move, drag empty space to box-select, right-click a unit for quick actions.
- Quick Looks for instant looks; Internal Sequence + Auto-Next to audition the catalog.
- Record Sequence + Record captures watermarked clips; Videos lists them.
- Downloads and Setup are for the desktop receiver, which Part 5 covers.
Two-minute practice
- Add two units, invert one of them, and arrange all eight in a straight row.
- Audition sequences 010, 030 and 051 with Auto-Next off, then on.
- Record a Burst with Record Sequence ticked and find it under Videos.
- Reset Demo.